

Rounding Bottom Pattern: Structure, Confirmation, and Failure
A rounding bottom pattern is a broad U-shaped base after a decline. It is a potential bullish reversal, with confirmation at a break above the earlier reaction high. A rounded shape alone does not confirm a reversal, and no handle is required.
AI Detection
Use AI Chart Analysis as a second review
Pineify can help interpret a chart screenshot. Its response may miss context or misread a level, so compare it with your own chart annotations.
Prepare a readable chart
Include the symbol, timeframe and relevant swings. A screenshot can omit price history needed to assess the setup.
Review the structure
Pineify analyzes an uploaded chart image and returns chart-pattern commentary, price levels, risks, and uncertainties. Compare its interpretation with your marked neckline, dates, and closing prices; a screenshot assessment can misread the structure.
Check the interpretation
Compare the response with the chart. Verify each price level yourself and record confirmation and invalidation rules before considering a trade.
How to Detect It
Step-by-Step Detection Guide
Work through the chart in order. Treat each condition as a check, and record why a setup fails as well as why it qualifies.
Record the base and its context
On a weekly TradingView chart, mark the preceding decline, left reaction high, trough, and recovering right side. Save the symbol, dates, and price scale.
Write confirmation and failure rules
Fix the neckline, acceptable geometry, close requirement, and any volume filter before inspecting later bars. Distinguish an incomplete candidate from a confirmed breakout.
Check the chart and review the screenshot
Compare the completed bars with those rules, then upload a clear screenshot to Pineify for a second interpretation. Resolve disagreements using the underlying prices and volumes.
Read the structure before drawing the curve
StockCharts describes the rounding bottom, or saucer bottom, as a long consolidation that changes from bearish to bullish conditions, usually viewed on weekly charts. The decline, base, and recovery need not form a perfect geometric arc. Volume often contracts around the base and increases during the recovery.
Mark the reaction high at the start of the base before assessing a breakout. This horizontal resistance is often called the neckline. Keep the original level visible as more bars appear; moving it lower to accommodate price changes the test.
- Context: show enough earlier bars to establish the decline that the proposed base would reverse.
- Shape: check several observations across the decline, trough, and recovery. A single sharp rebound provides little evidence of a broad base.
- Confirmation: distinguish an unfinished right side from a break of the premarked resistance. Define whether your own rule uses an intrabar trade or a completed close.
A worked weekly example with explicit assumptions
Synthetic data prepared on 17 October 2026
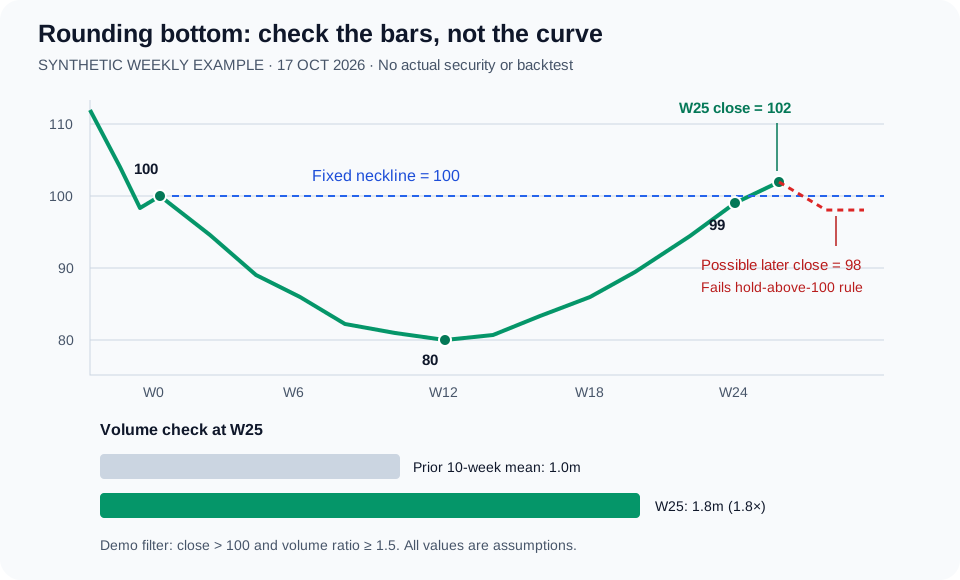
Assume a hypothetical asset declined from 116 before forming a reaction high of 100 at week 0. Selected weekly observations are: week 0 = 100, week 6 = 86, week 12 = 80, week 18 = 86, and week 24 = 99. These points describe the example; they do not replace the intervening OHLC bars needed to test a real chart.
For this exercise, accept a rim difference no greater than 2%, a recovery duration between 0.75 and 1.5 times the decline duration, and a completed weekly close above the fixed neckline of 100. Require breakout volume of at least 1.5 times the preceding 10 completed weeks. These are chosen demonstration filters, not universal rounding-bottom thresholds or validated trading settings.
- Duration: week 0 to week 12 is 12 intervals; week 12 to week 24 is 12 intervals. Recovery/decline = 12/12 = 1.00, within the chosen 0.75 to 1.5 range.
- Depth: 100 − 80 = 20 price units, or 20/100 = 20% of the left rim price.
- Rim difference: |99 − 100|/100 = 1%, within the chosen 2% tolerance. Week 24 still has no breakout close.
- Breakout: week 25 closes at 102, above 100. Its 1.8 million volume divided by the previous 10-week average of 1.0 million is 1.8, above the 1.5 threshold.
- Failure branch: a later weekly close at 98 returns below 100 and fails the hold-above-neckline rule used here. It does not require waiting for a new low below 80.
Mark the candidate on TradingView
Choose the symbol and weekly interval, then show the preceding decline and the full candidate base. Use a horizontal line for the reaction high and price notes for the trough and right rim. the TradingView Curve drawing tool can connect the two ends with an adjustable bend; its Coordinates panel allows precise price and bar positions.
Record the anchor dates and prices alongside the curve. Keep the symbol, interval, price scale, date axis, and volume pane visible in the screenshot. The curve is an annotation: changing its control point can make many unrelated price paths look rounded. Confirmation must come from the recorded bars and your fixed rule.
Rounding bottom versus cup and handle
A rounding bottom does not require a separate handle. A cup and handle includes a shorter pullback or range after the cup recovers, then a breakout from that handle. Its traditional context is continuation of an earlier advance.
In the example, price moves from the recovered rim to a breakout without a distinct intervening handle, so the page treats it as a rounding-bottom candidate. If a separate pullback develops later, document that additional structure and its own resistance. Do not invent a handle by renaming an ordinary wiggle inside the base.
What rejects the candidate or fails the breakout?
Separate a failed drawing hypothesis from a failed breakout. A candidate may never reach resistance; a confirmed close can still reverse. Record both outcomes when evaluating a rule, including charts that looked promising before the final bars were available.
- Missing right side: a trough followed by only a few recovering bars remains an incomplete candidate under a broad-base interpretation.
- Intrabar breach: if the rule requires a weekly close above 100, a high of 103 followed by a close of 99 does not pass.
- Volume filter fails: a close above 100 with only 1.2 times the reference volume fails the combined rule in this example. It does not prove that every lower-volume breakout must fail.
- Return inside the base: the illustrated close at 98 invalidates the chosen breakout rule. A close below the trough at 80 would also contradict the proposed base.
- Overfitting: repeatedly changing the start date, tolerance, or volume window after seeing the outcome prevents a fair test. Freeze the rules before checking later bars.
- Input ambiguity: cropped axes, missing volume, a different price-scale setting, or unreadable candles can change the apparent curvature. Check numerical prices before accepting a visual match.
Use Pineify to review the evidence
Upload the annotated screenshot to AI Chart Analysis with the symbol and interval visible. Compare the returned chart-pattern explanation and price levels with your own anchors. If a level is missing or disagrees with the source chart, resolve it from the chart data. A confidence score is not a measured probability that the breakout will succeed.
For a repeatable screen, use Pine Script AI Coding Agent to turn explicit requirements into code: window length, rim tolerance, duration ratio, completed-bar confirmation, volume reference window, and failure condition. Ask it to expose the inputs and mark the bars that passed each condition. Review and test the generated script before using its alerts. This page provides a rule specification, not an automated detector or a claim of tested profitability.
This is educational chart analysis, not investment advice. Real execution adds fees, slippage, and possible gaps; a pattern label or invalidation level does not guarantee a fill or limit a loss.
Sources and related guides
Sources checked 2026-10-17.
- StockCharts ChartSchool: Rounding Bottom
Conventional structure, resistance confirmation, and volume context.
- StockCharts ChartSchool: Cup With Handle
The separate handle and continuation context distinguish the two patterns.
- TradingView: Curve and double curve drawing tools
Drawing controls and anchor coordinates; drawing an arc does not verify a pattern.
FAQ
Frequently Asked Questions About Rounding Bottom Pattern on TradingView: Rules and Failures
Definitions, confirmation and limits of the pattern.
Review your chart annotations
Use a screenshot to ask Pineify about the structure, then check its interpretation against the original chart. The response does not establish a trading edge.
Open AI Chart AnalysisPast performance is not indicative of future results. AI-generated scores and stock picks are predictive in nature and are not guaranteed to produce any particular outcome or return. Nothing on this page constitutes financial advice, investment recommendation, or solicitation to buy or sell any security. All investment decisions involve risk, including the potential loss of principal. You should conduct your own independent research and consult with a qualified financial advisor before making any investment decisions. The AI model may miss or misinterpret market-moving events, and scores can change without notice.