Create Your First Strategy
Only subscribed users can create strategies.
Next, we will create a simple yet effective long trend trading strategy in detail. The core of this strategy is to use the crossover signals of short-term and medium-term moving averages.
When the 20-day Exponential Moving Average (EMA 20) crosses above the 50-day Exponential Moving Average (EMA 50), we will enter the market with a buy order at the market price. At the same time, when entering the market, we need to set corresponding take-profit and stop-loss points to ensure the protection of our funds during market fluctuations and to lock in profits when the expected target is reached. This strategy combines technical analysis and risk management, providing traders with a clear operational framework.
Create Empty Strategy
Open the Pineify Builder, click the "Create" button on the homepage. In the pop-up dialog box, you need to choose the type of strategy and then select the corresponding blank template in the subsequent options.

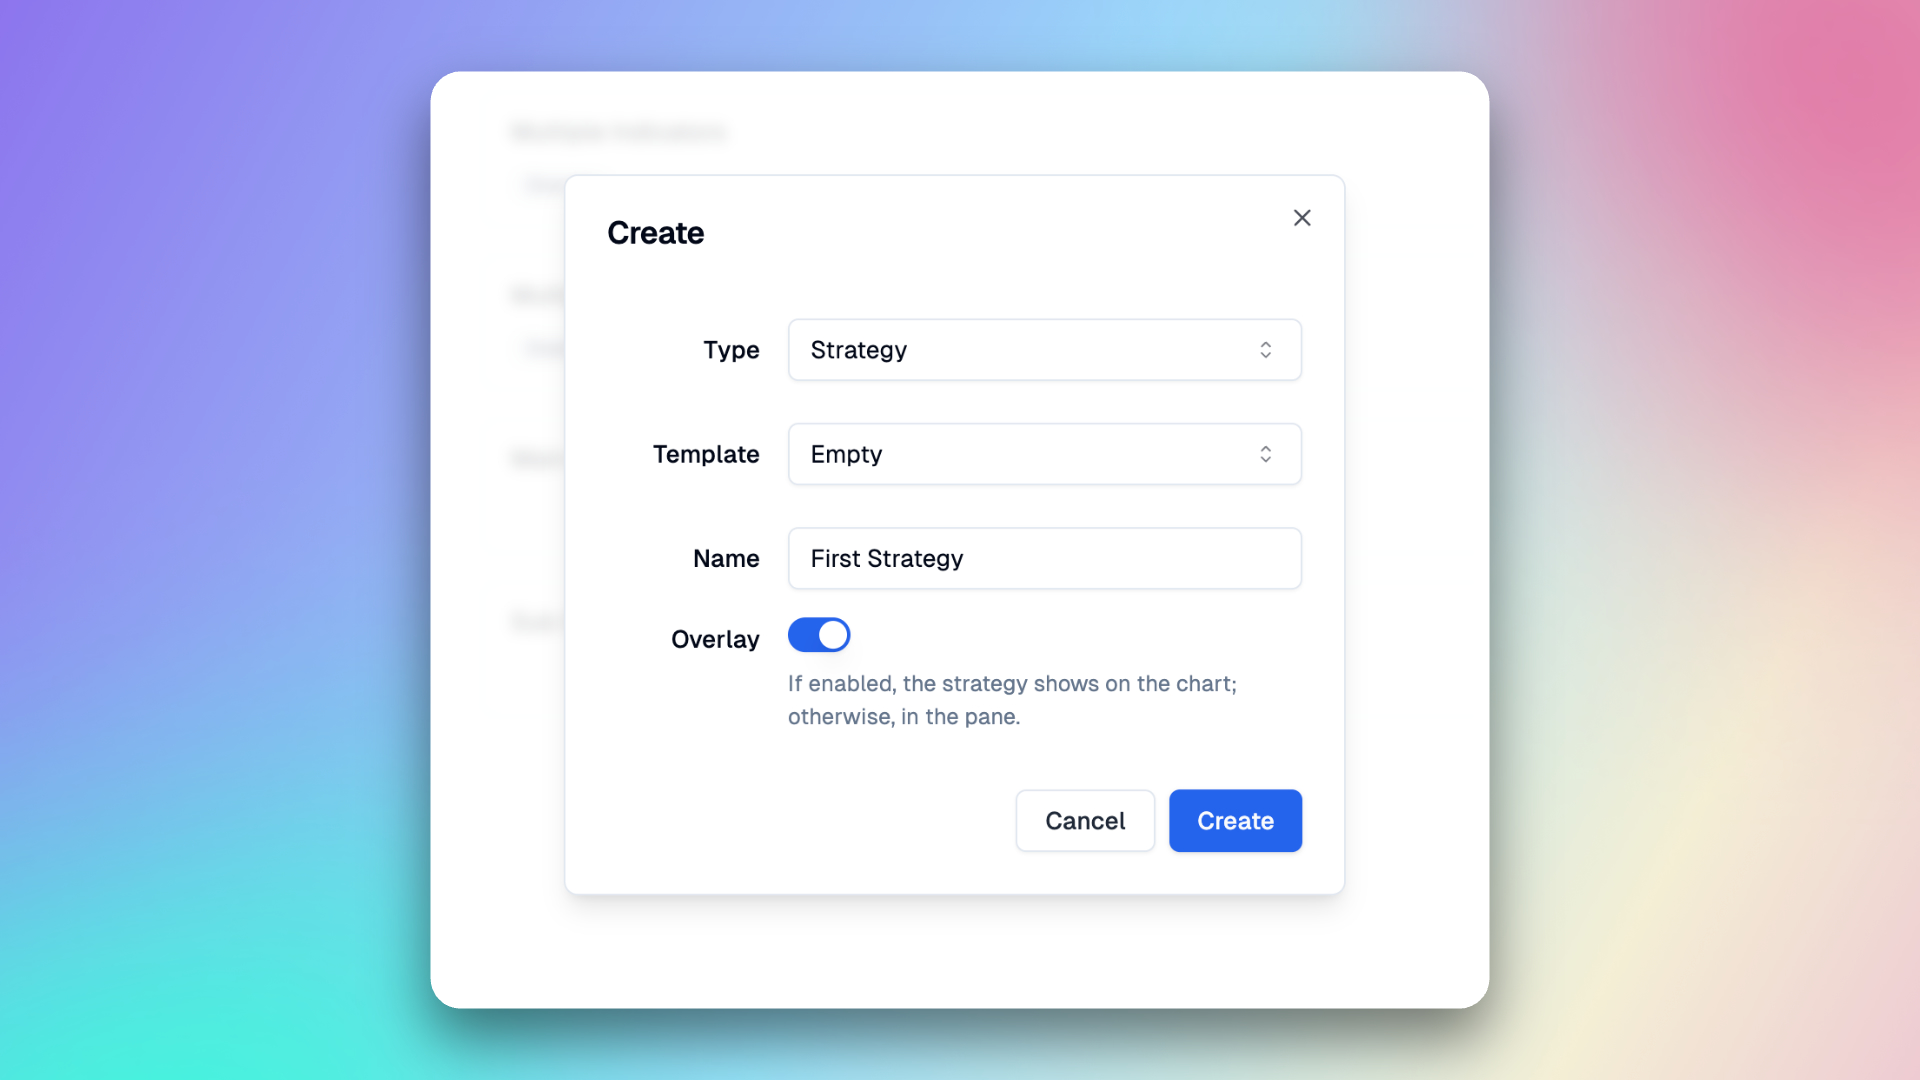
Now an empty strategy has been created, let's proceed step by step to build this strategy 🥳.
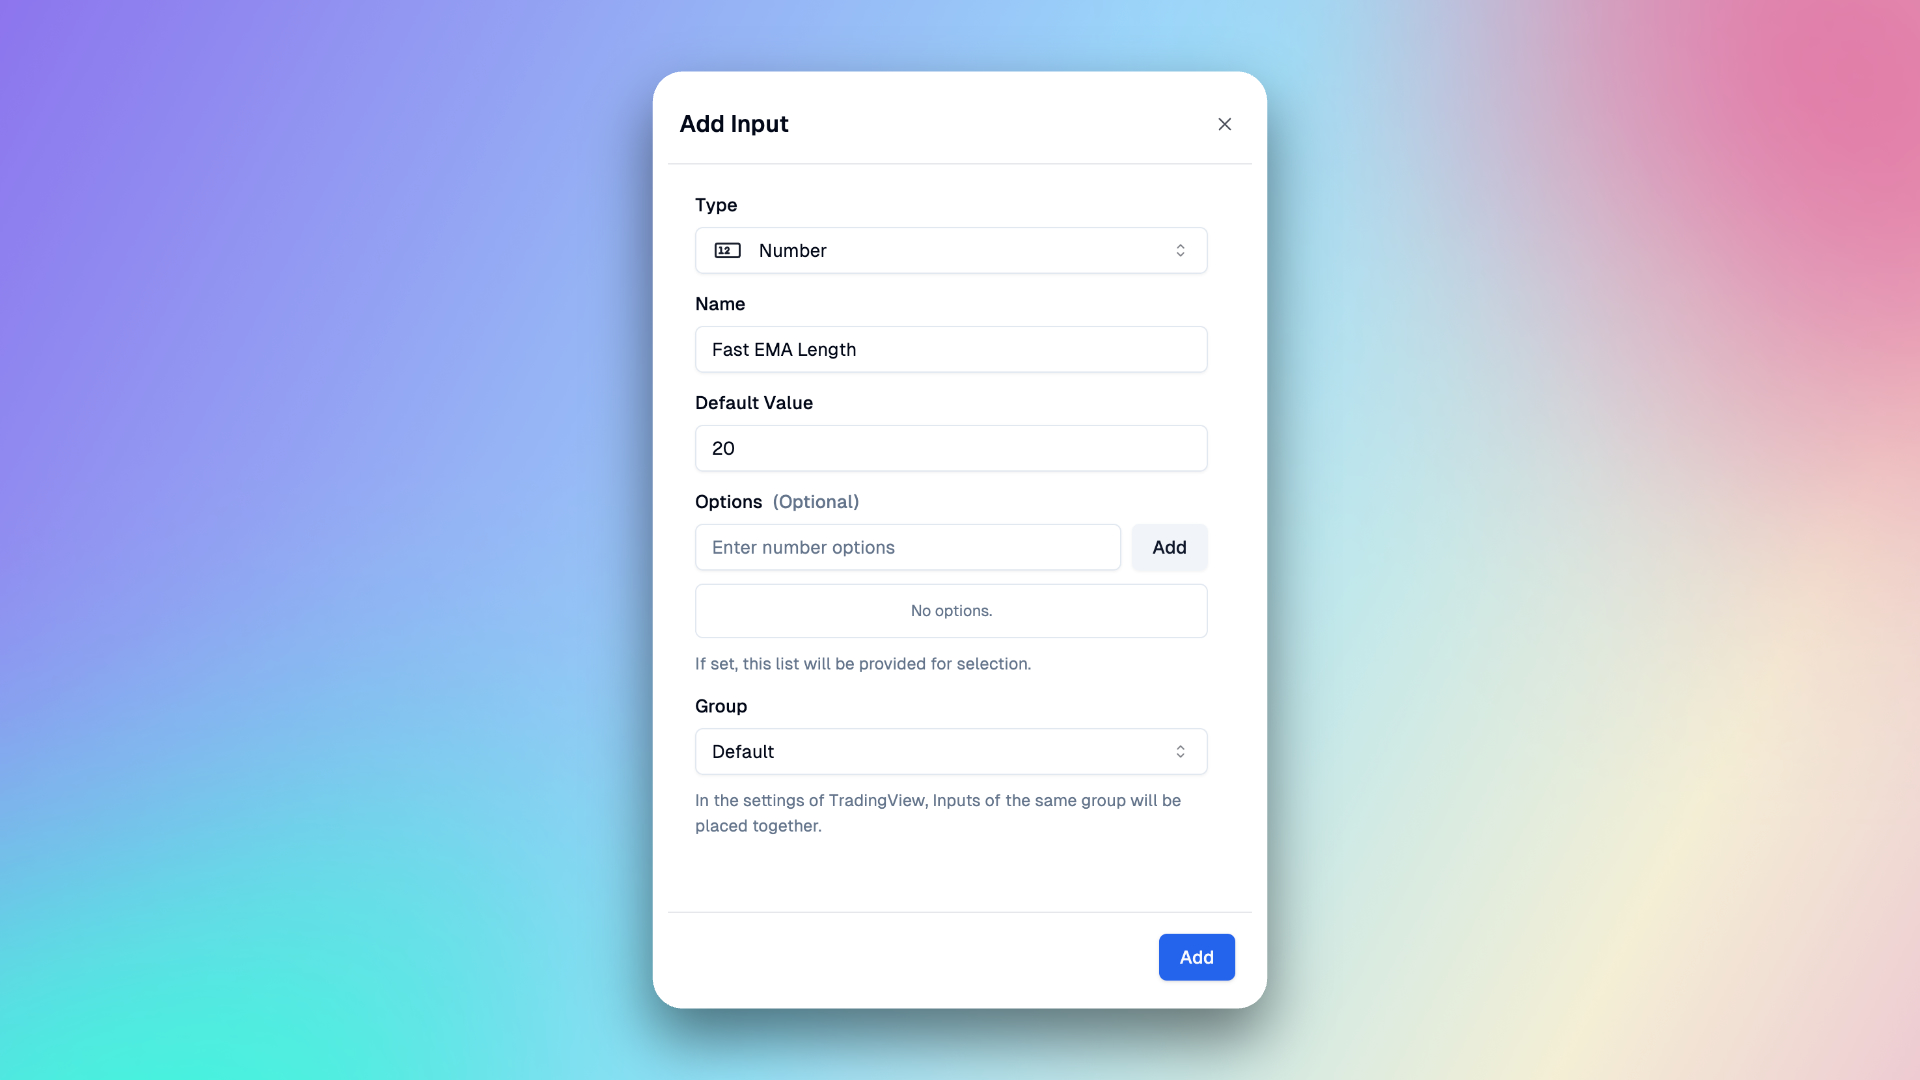
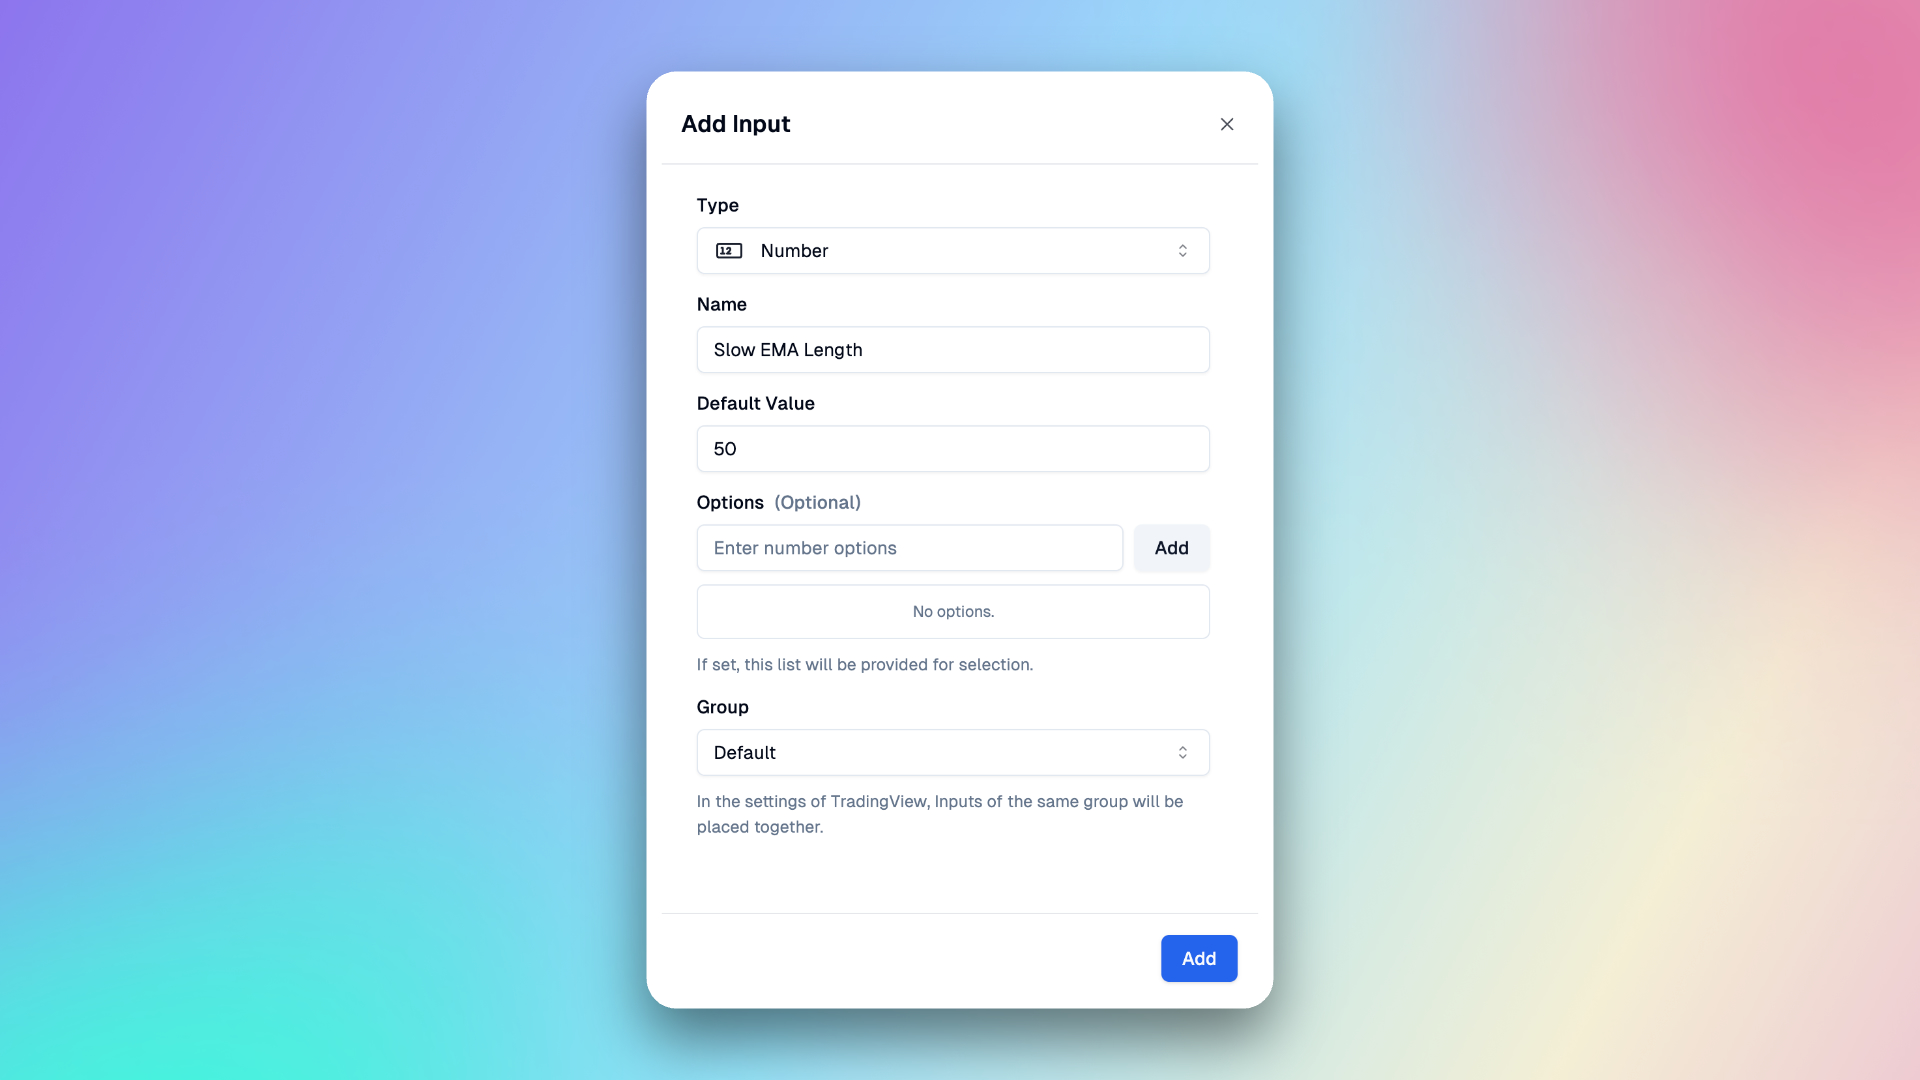
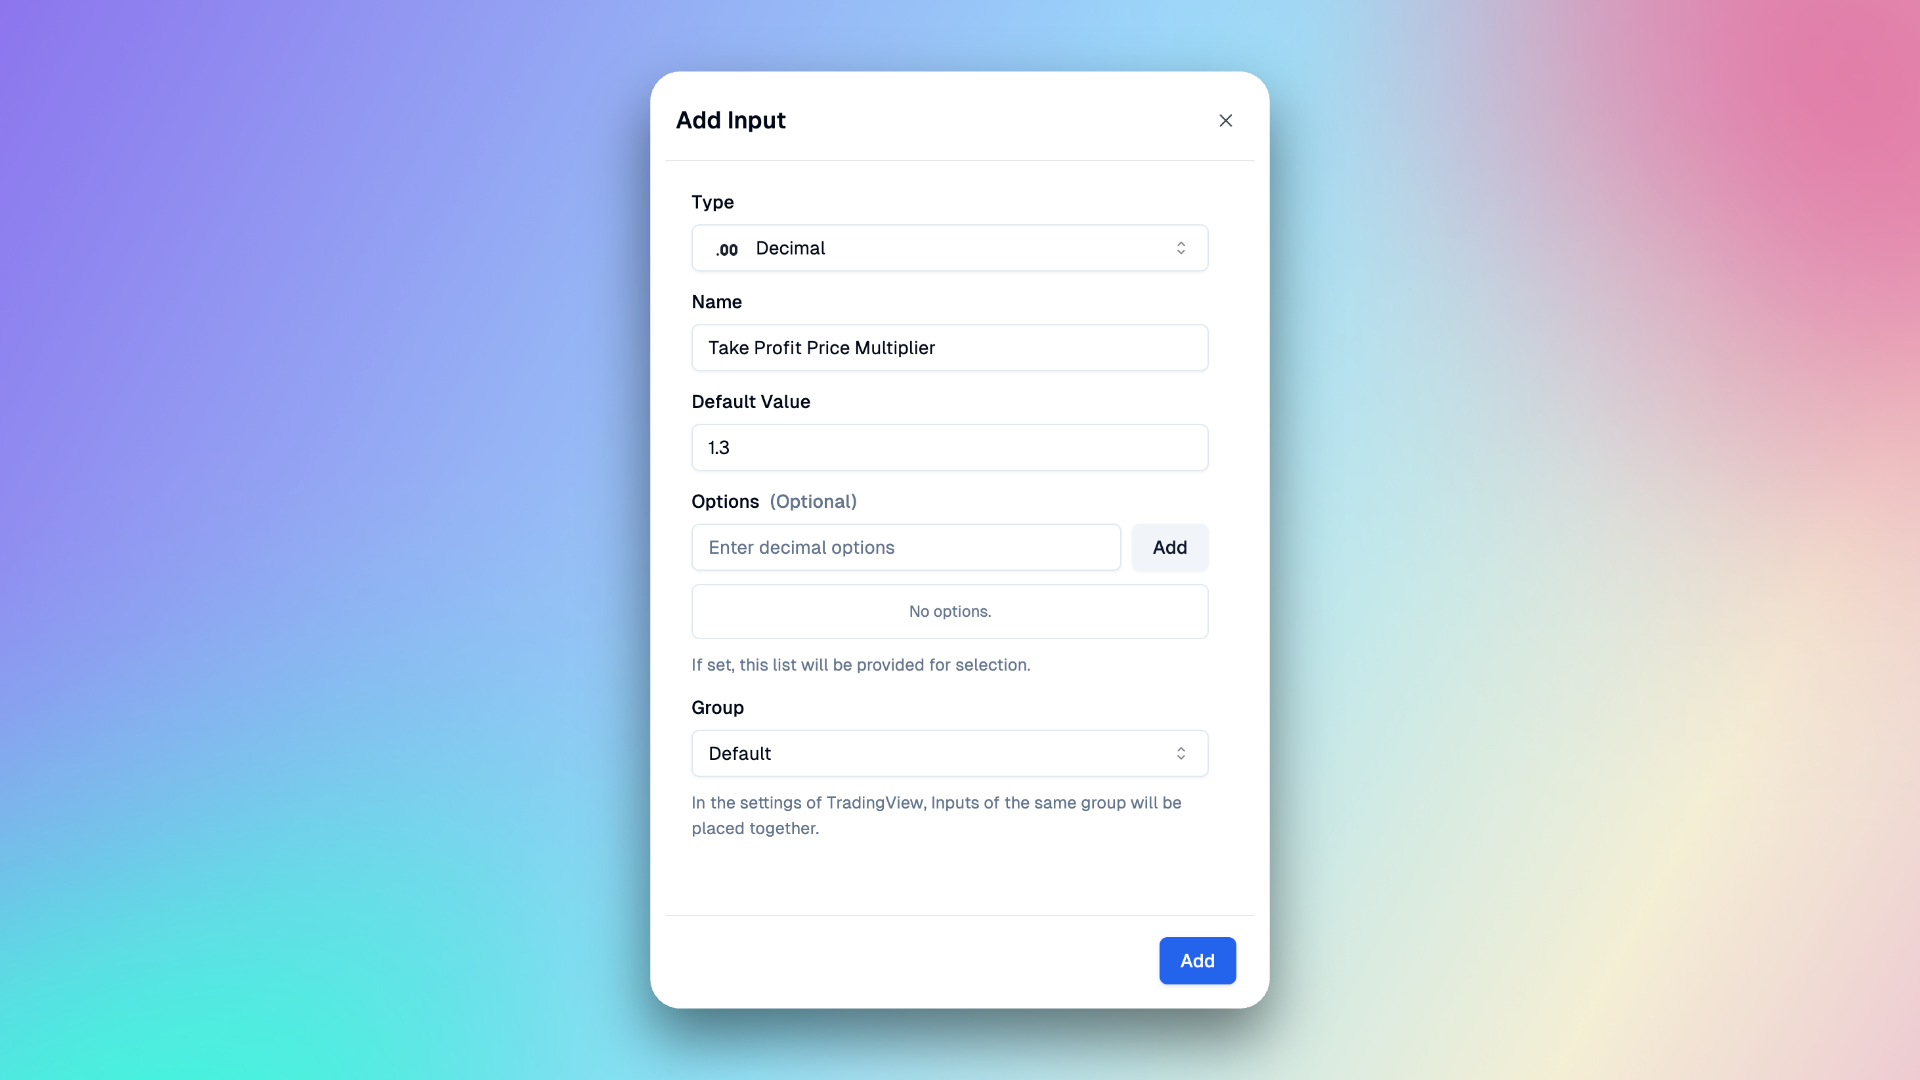
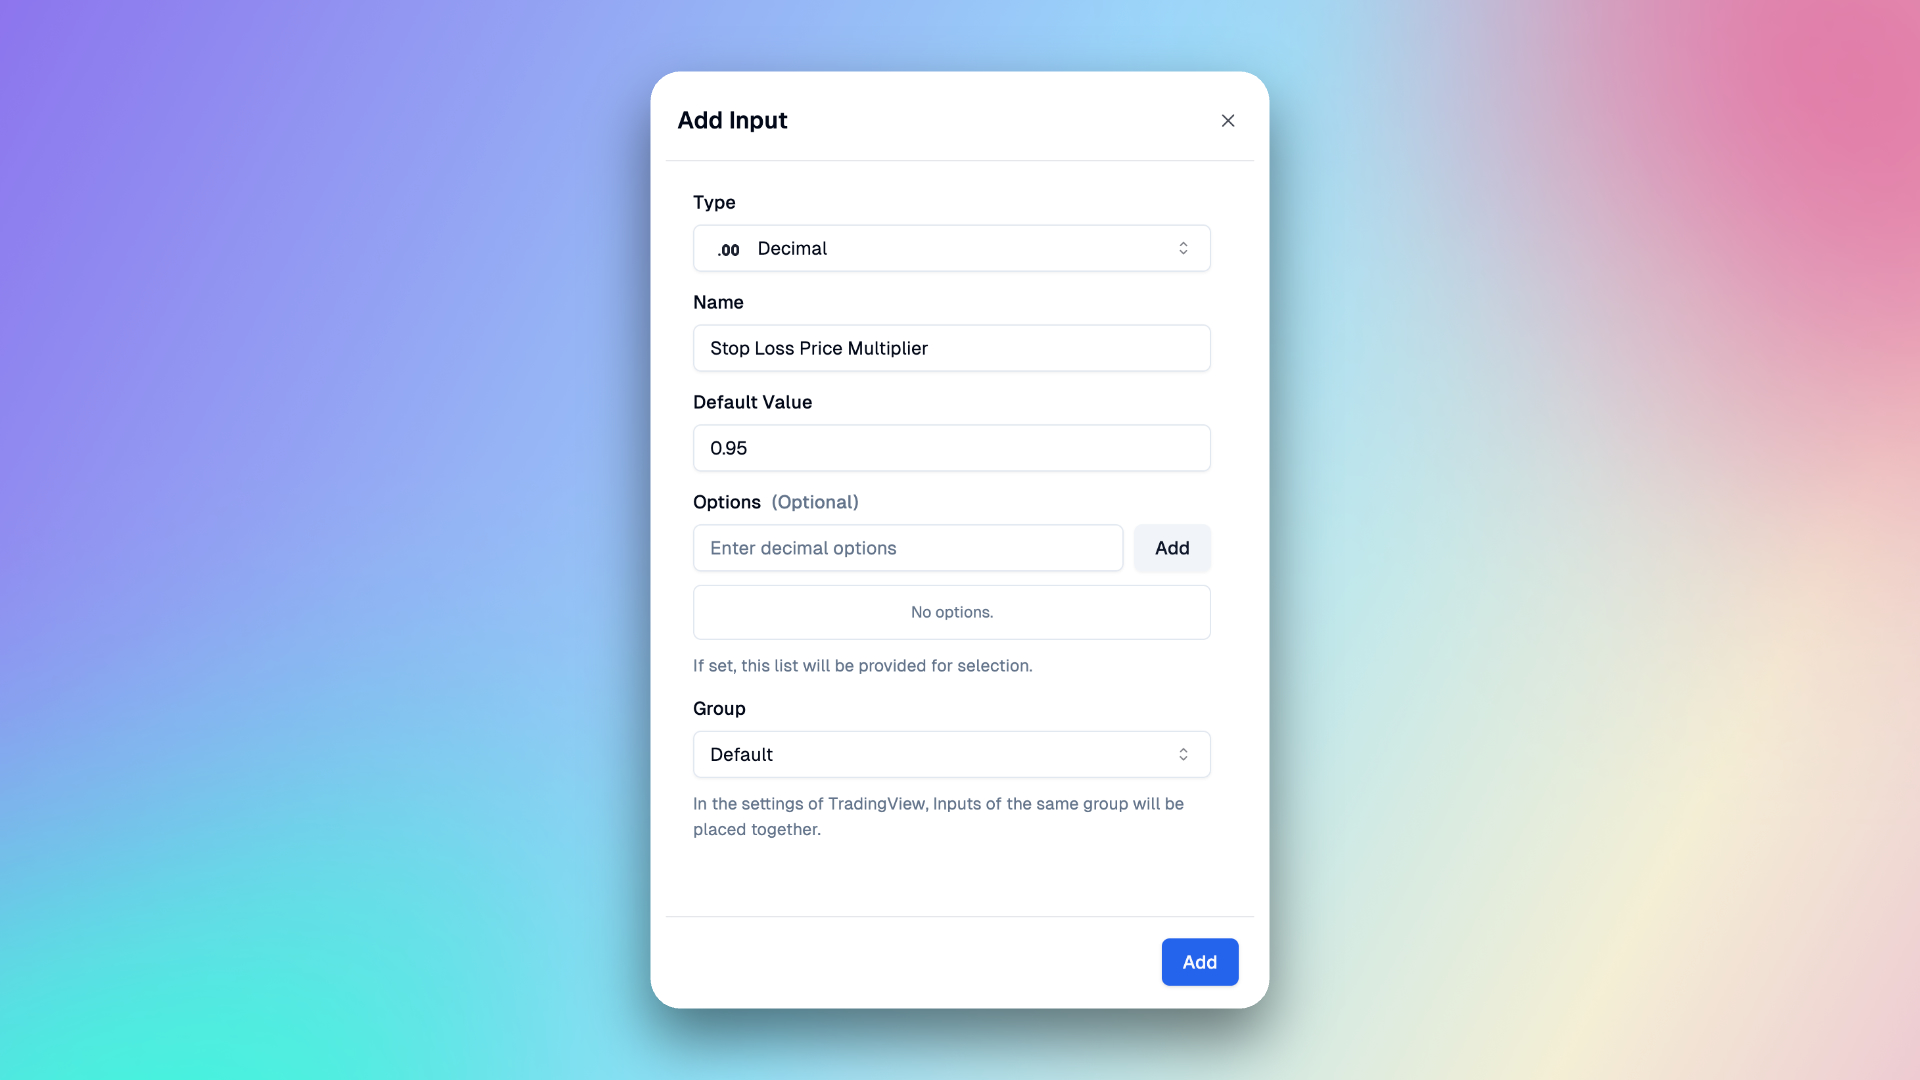
Add input
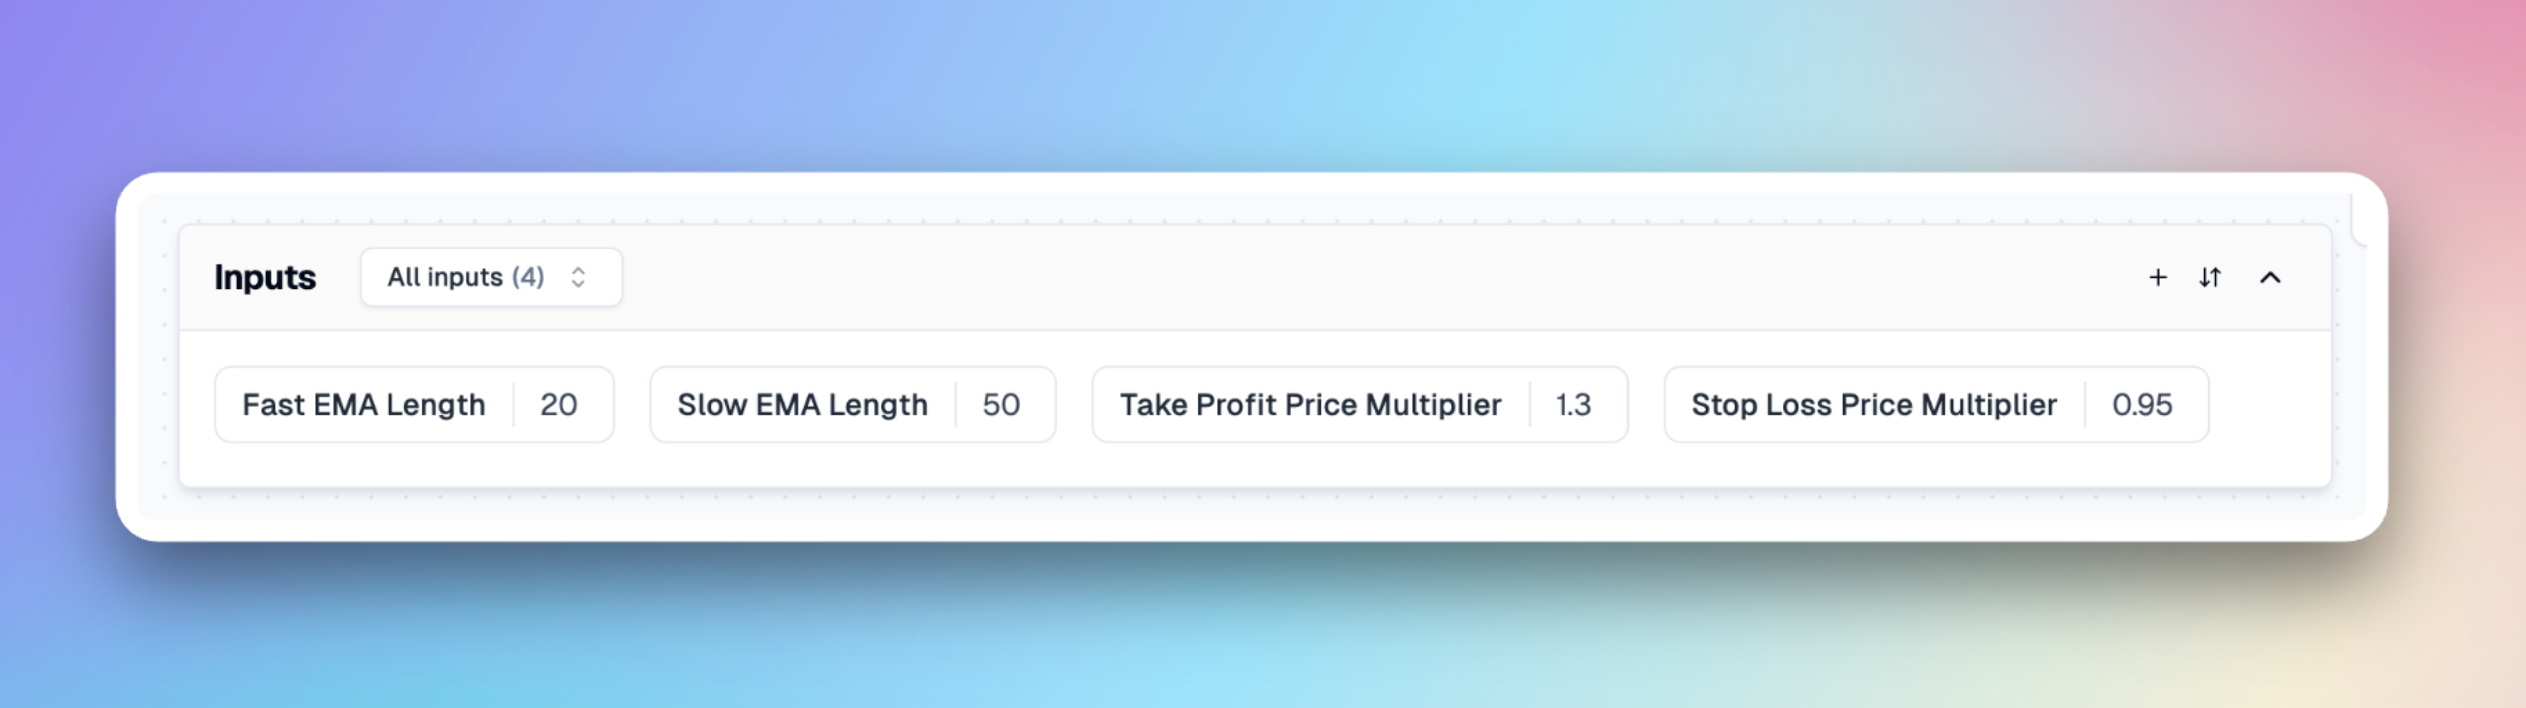
Here we create a total of four Inputs: Fast EMA Length, Slow EMA Length, Take Profit Price Multiplier, and Stop Loss Price Multiplier.
-
Fast EMA Length
-
Slow EMA Length
-
Take Profit Price Multiplier: Indicates that the take profit price is a multiple of the entry price (i.e., close). This means that when the entry price is multiplied by this coefficient, the take profit price is determined.
-
Stop Loss Price Multiplier: Indicates that the stop loss price is a multiple of the entry price (i.e., close). This means that when the entry price is multiplied by this coefficient, the stop loss price is determined.
After completing the setup, we'll have these four Inputs in our Inputs panel.
Add indicator
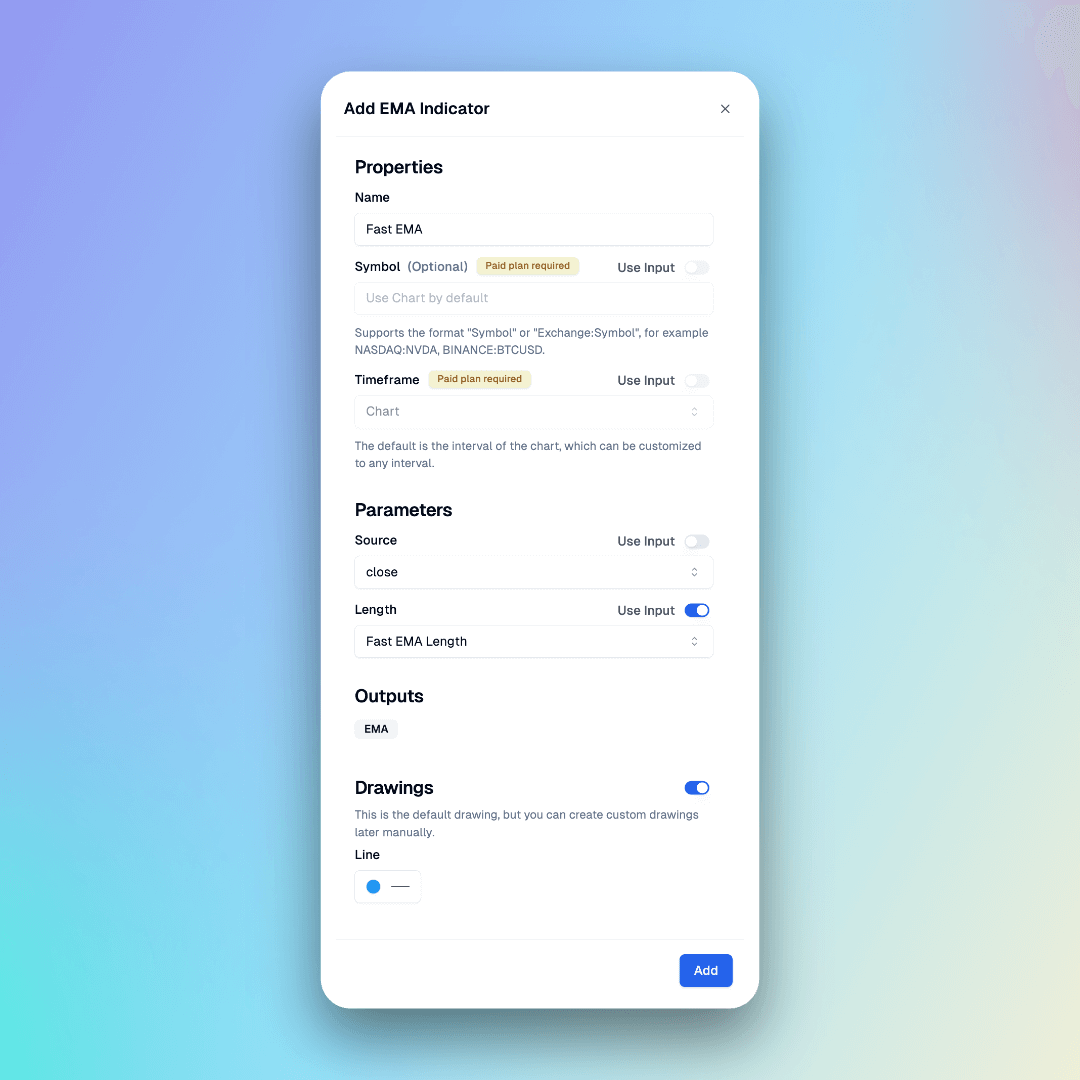
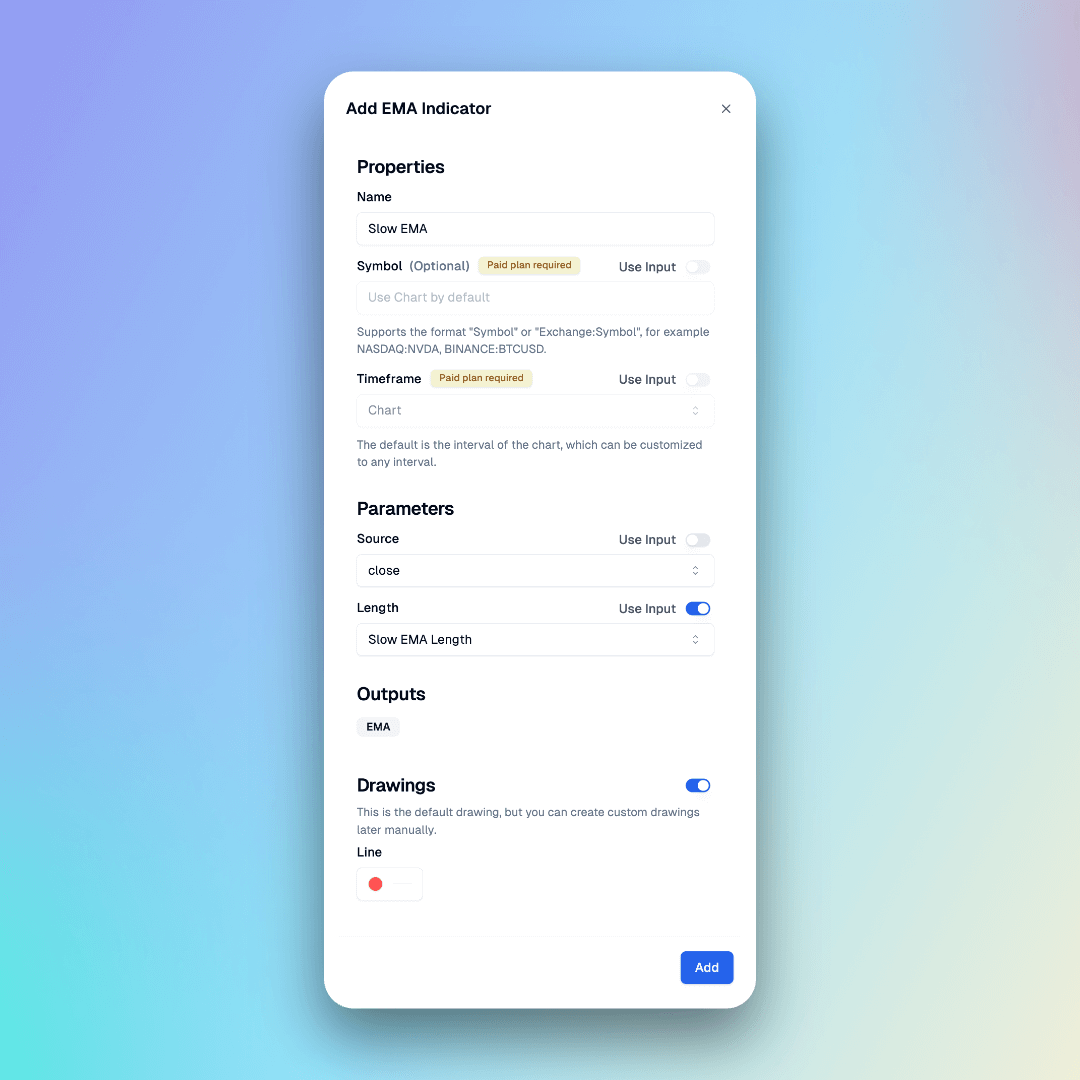
Next, select indicators in the right panel, here you can search for indicators, here we search for ema and then add them.
We need to create two indicators: Slow EMA, Fast EMA.
In the dialog, we just need to enter the indicator names and bind the parameters to the corresponding Inputs we've just created, and select the style in Plots, such as the color and width of the line.
-
Fast EMA
-
Slow EMA
After completing the setup, these two indicators will be added to our Indicators panel.

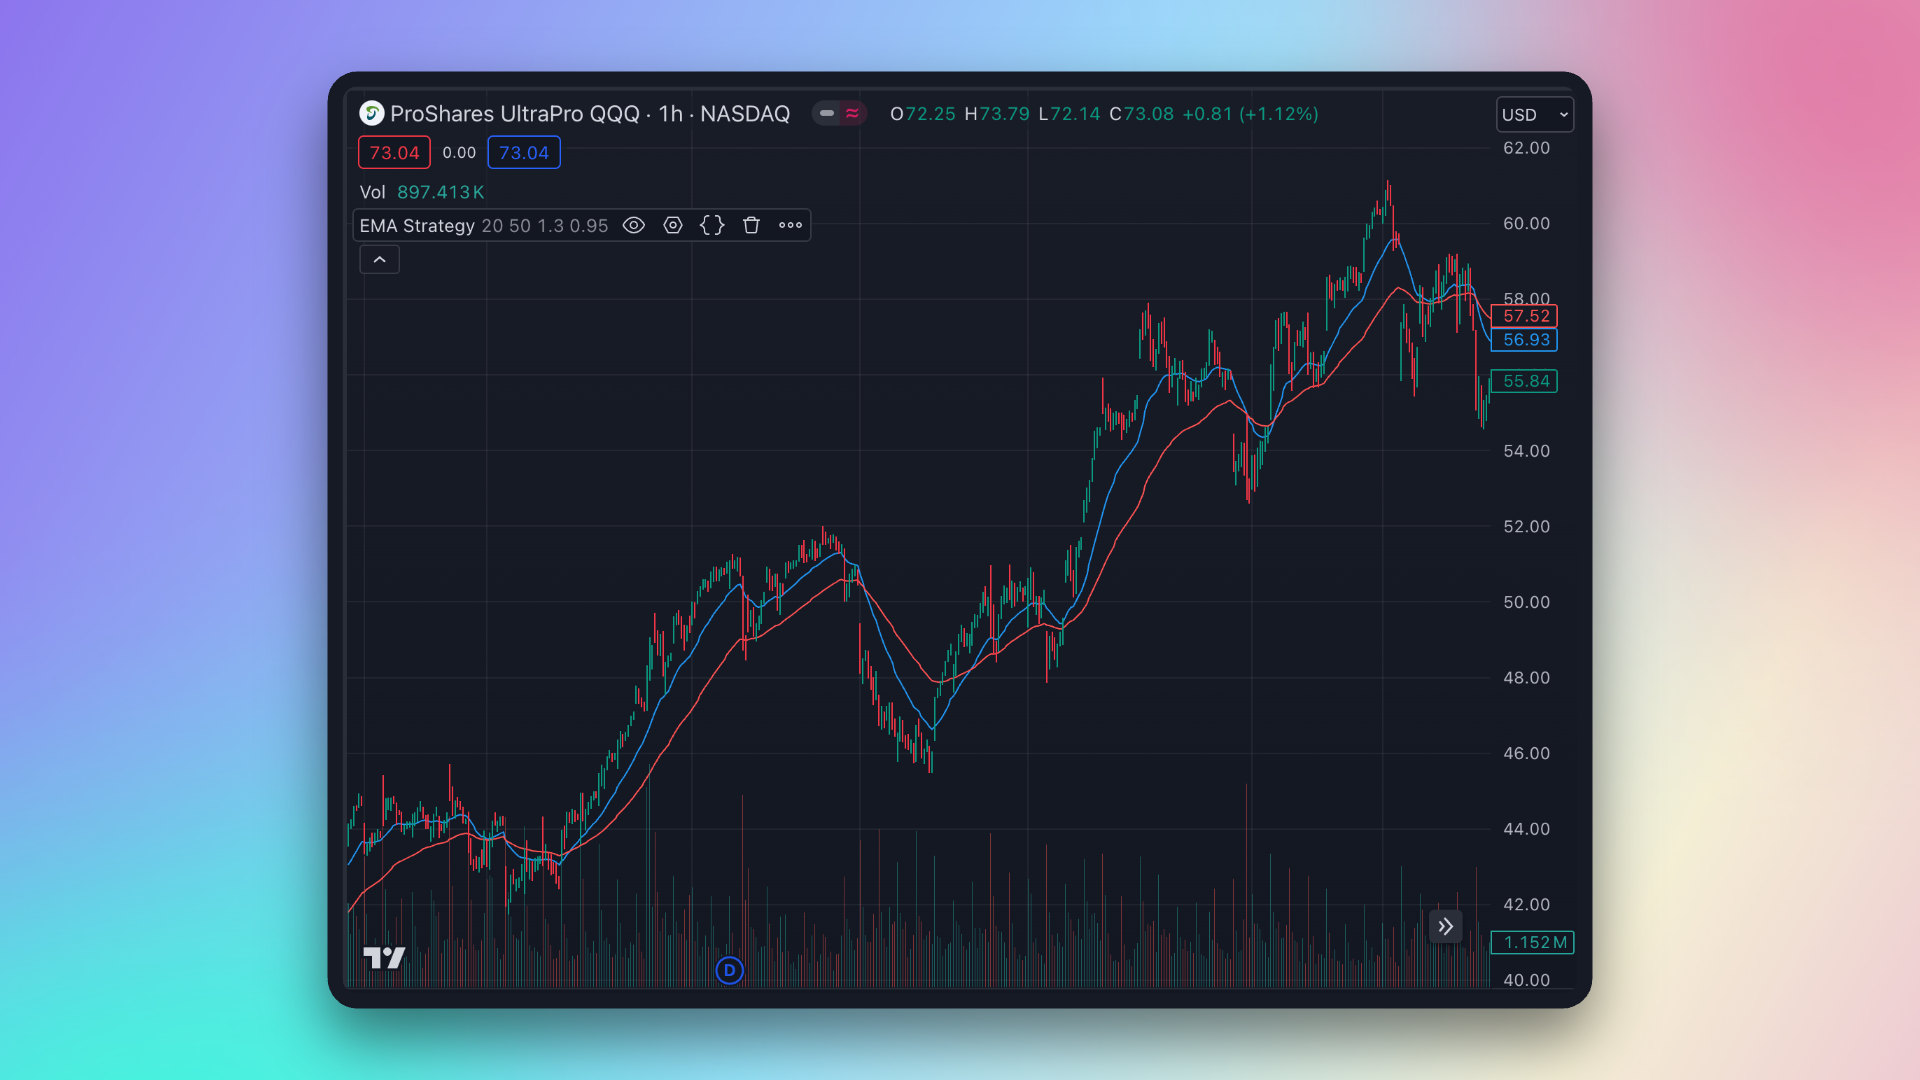
Now, click the 'Copy Code' button in the top right corner, and then create a new strategy in TradingView and paste the code. You will see the default plots of these two EMA on the main chart.
Next, continue to create conditions.
Add condition
Since we are only doing long trades here, we only need to create a buy condition.
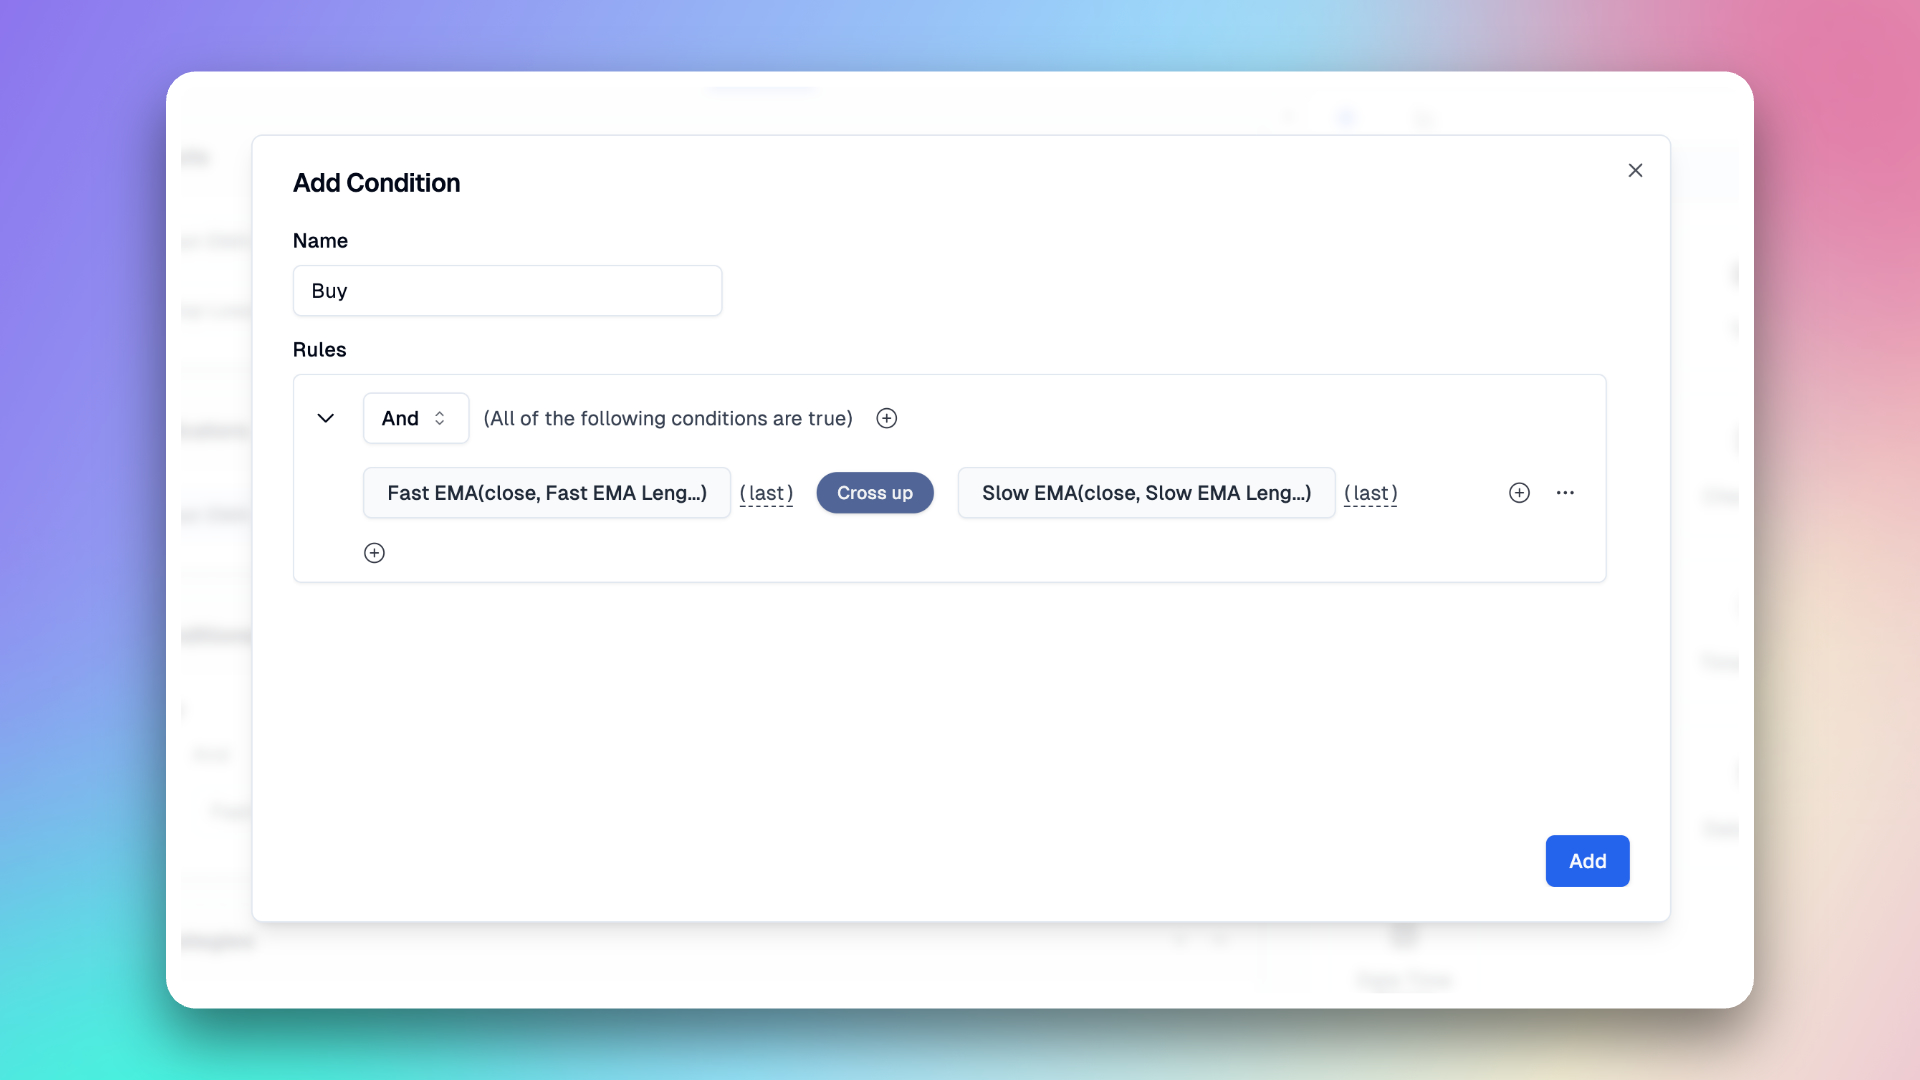
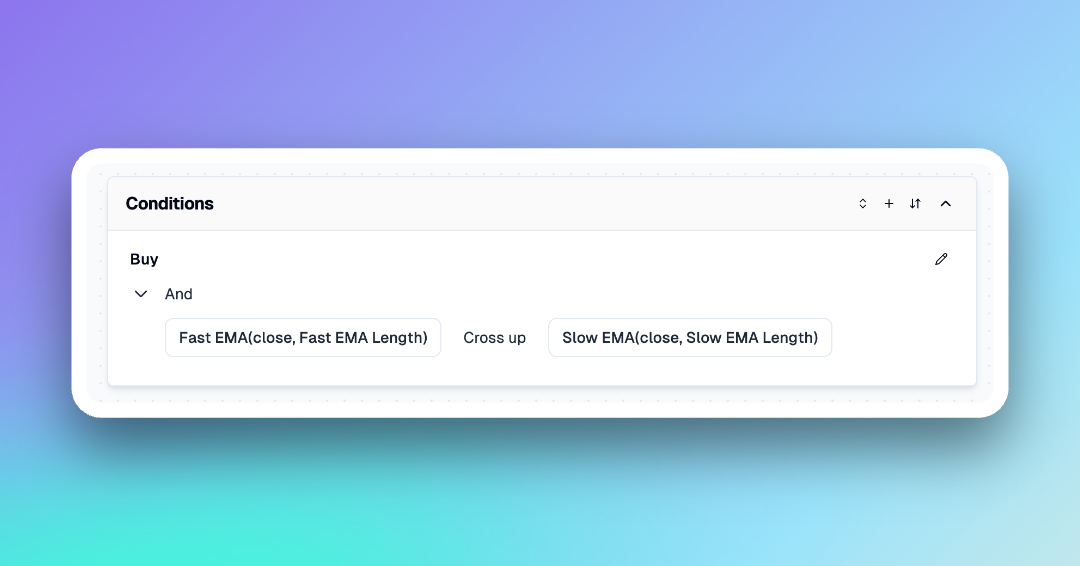
After completing the setup, the buy condition will be added to our conditions panel.
The next part is the key section of the strategy, which is the trading logic.
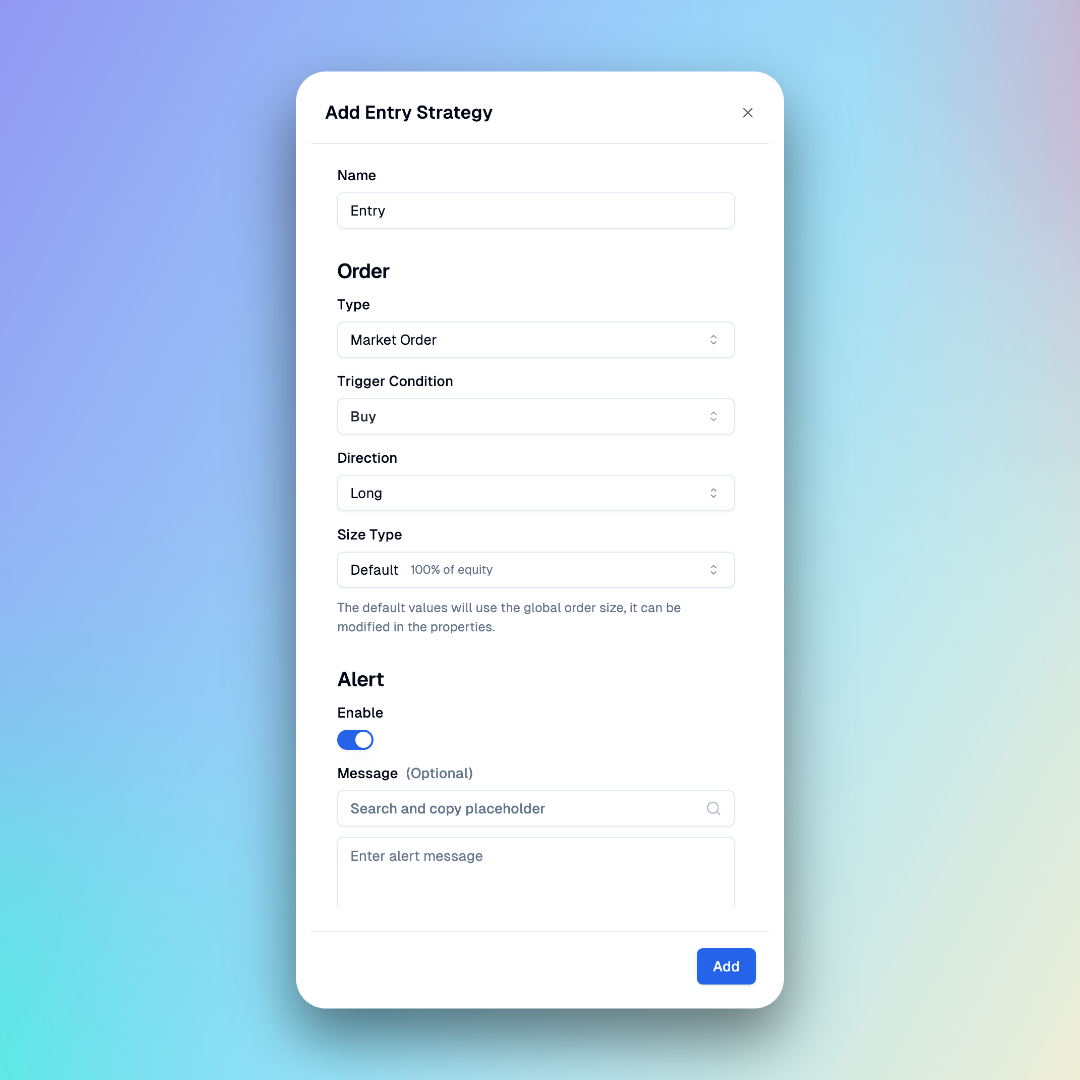
Add strategy entry
Click the "Add Strategy" button to select Entry to create an entry trade. Here is the information required to create an entry trade.
- Type: Indicates the type of order, currently only market orders are supported for entry.
- Trigger Condition: The condition that triggers the entry. Select the buy signal you just created here.
- Direction: Corresponds to long and short positions.
- Size Type: Sets the size of the order. The default value can be modified in the Properties Tab at the top to change the default strategy value (the default is to use 100% of available equity to buy). You can also modify it here to buy a specified quantity as needed.
- Alert Message: Used for the alert content triggered by the strategy.
Add strategy exit
Next, we need to create the exit logic of the strategy.
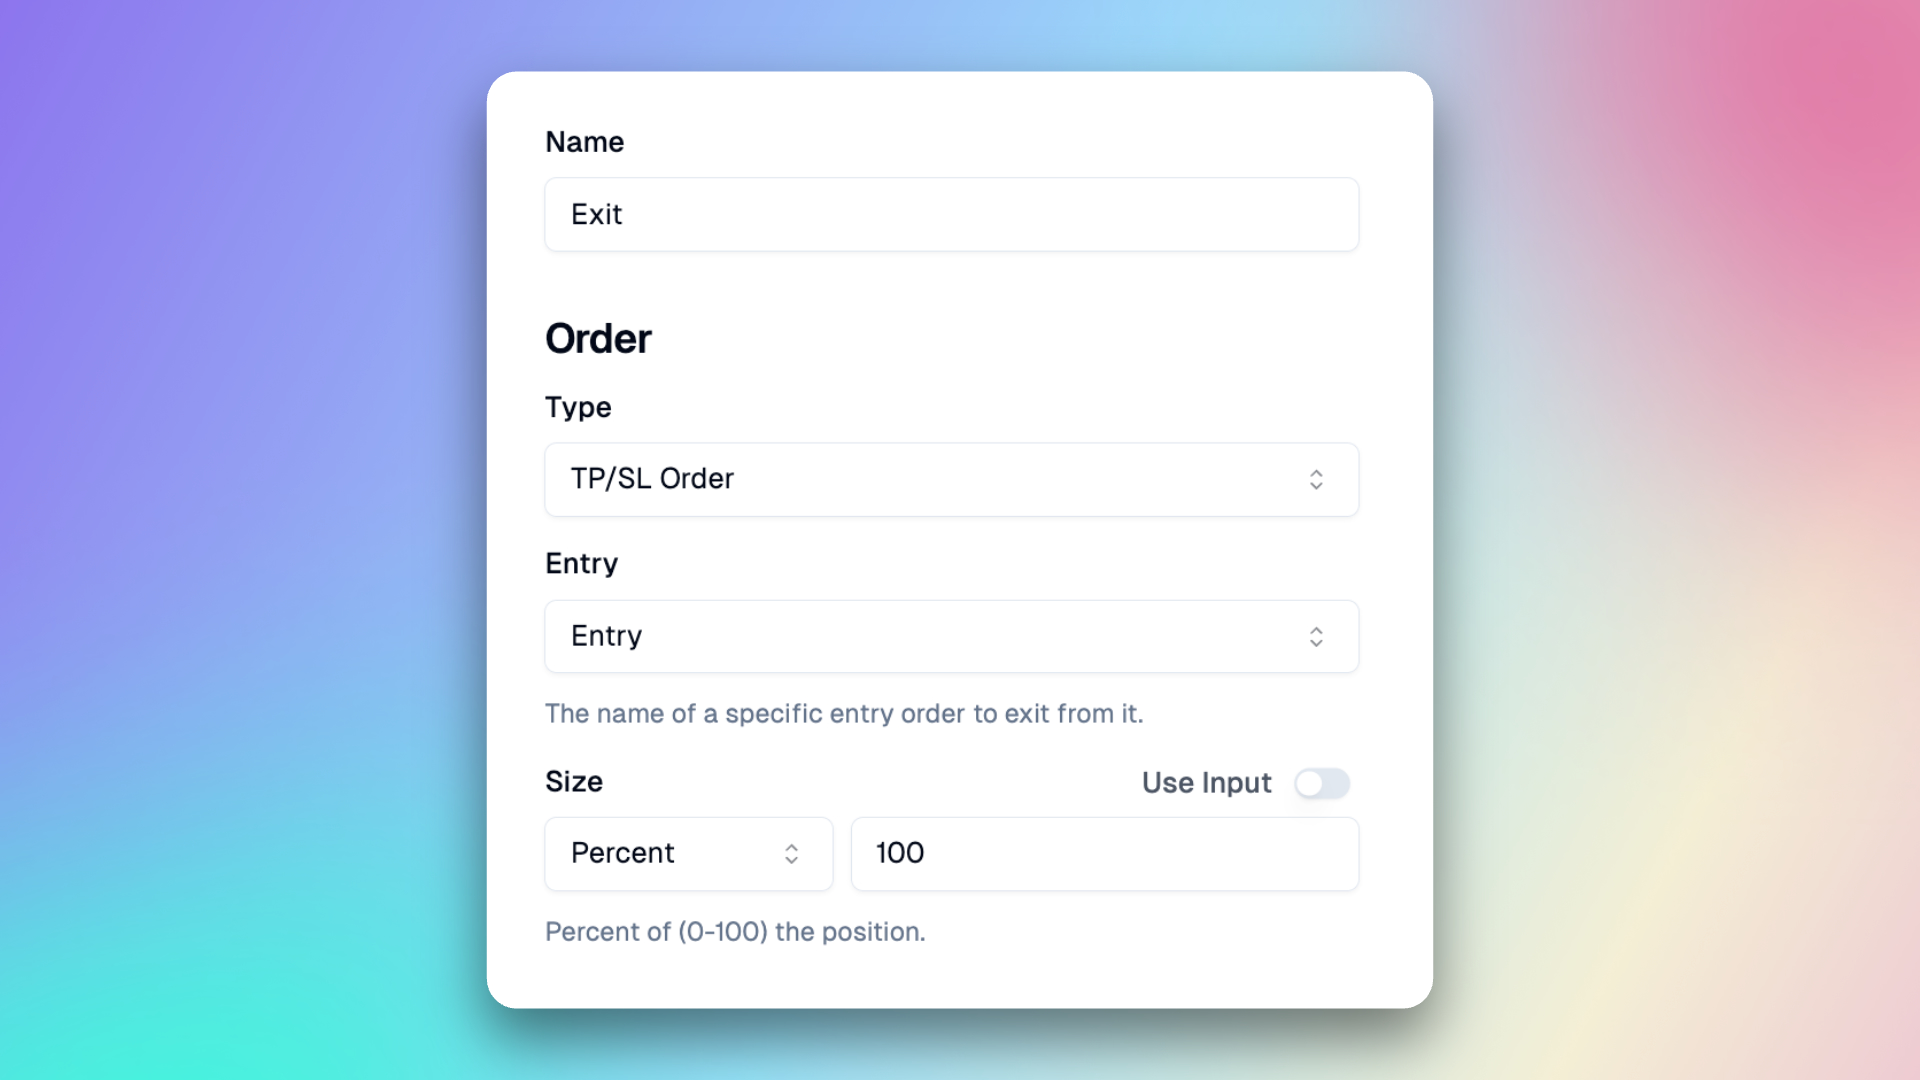
In the Strategies Panel, click the "+" button and select Exit. Here is the information required to create an exit trade.
Order
- Type: There are two types of exit orders supported. One is a market order exit, which requires specifying the exit conditions. The other is take-profit and stop-loss orders, which are set simultaneously when entering the market. In this strategy, we choose TP/SP Order here.
- Entry: Set which Entry the current Exit is associated with, or you can choose all entries. This parameter can be used to exit a specified Entry.
- Size: The proportion of the position to exit, default is 100%.
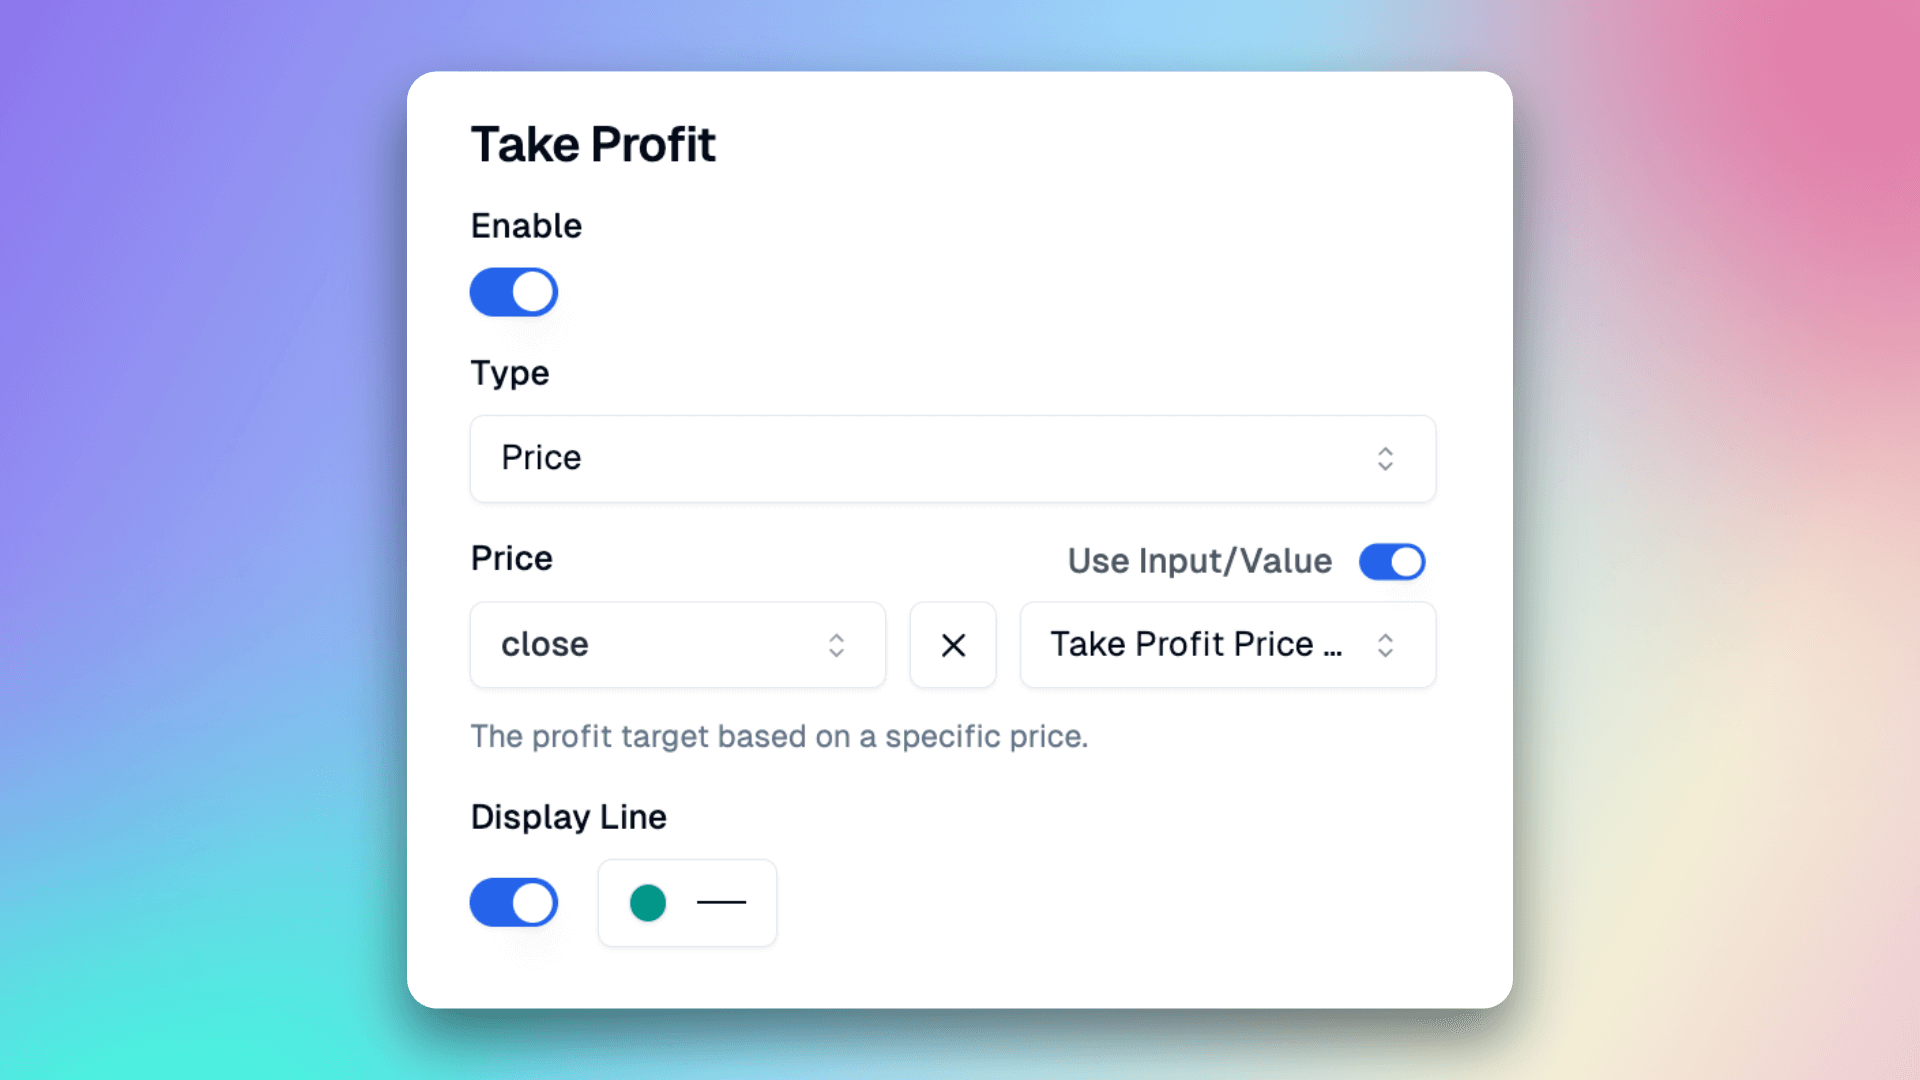
Take Profit
- Type: Here, you can specify the price and the number of ticks. Since our strategy requires a corresponding take profit price, we choose the price here. Specifying the price can help us better control the trade and ensure automatic take profit when the target price is reached.
- Price: The take profit price. Simple expressions are supported, including calculation logic with “+”, “-”, and “*”. Here, we set the take profit price to 1.3 times the close price on the entry day. This means if the closing price on the entry day is 100, the take profit price will be set to 130.
- Display Line: Whether to display the take profit line. We enable it here so that we can see the take profit line on the TradingView chart. This not only helps in real-time monitoring of the take profit situation but also aids in evaluating the strategy's effectiveness and making necessary adjustments.
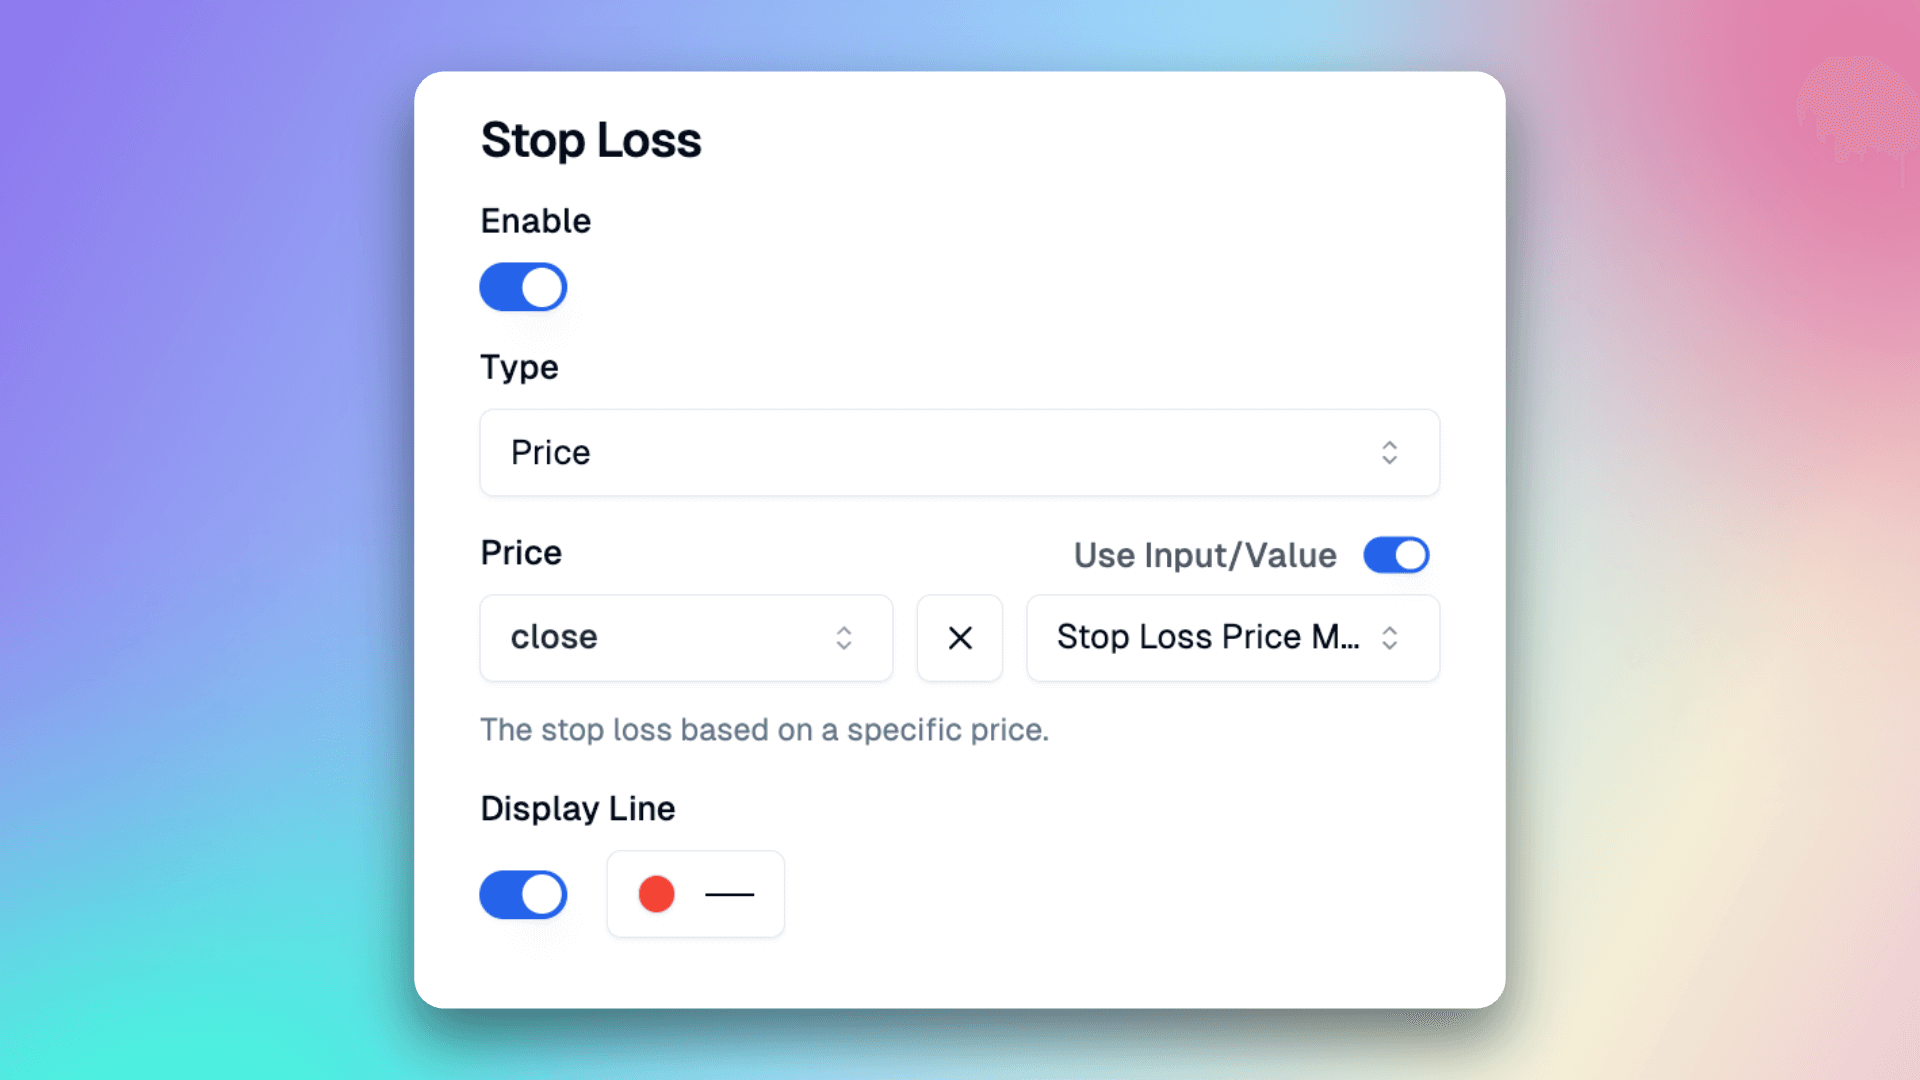
Stop Loss
- Type: Here, you can specify the price and the number of ticks. Since our strategy requires a corresponding stop loss price, we choose the price here. Specifying the price can help us better control the trade and ensure automatic stop loss when the target price is reached.
- Price: The stop loss price. Simple expressions are supported, including calculation logic with “+”, “-”, and “*”. Here, we set the stop loss price to 0.95 times the close price on the entry day. This means if the closing price on the entry day is 100, the stop loss price will be set to 95.
- Display Line: Whether to display the stop loss line. We enable it here so that we can see the stop loss line on the TradingView chart. This not only helps in real-time monitoring of the stop loss situation but also aids in evaluating the strategy's effectiveness and making necessary adjustments.
After successfully creating the Entry and Exit, click the 'Copy Code' button in the top right corner, and paste the latest code into the code editor on TradingView.
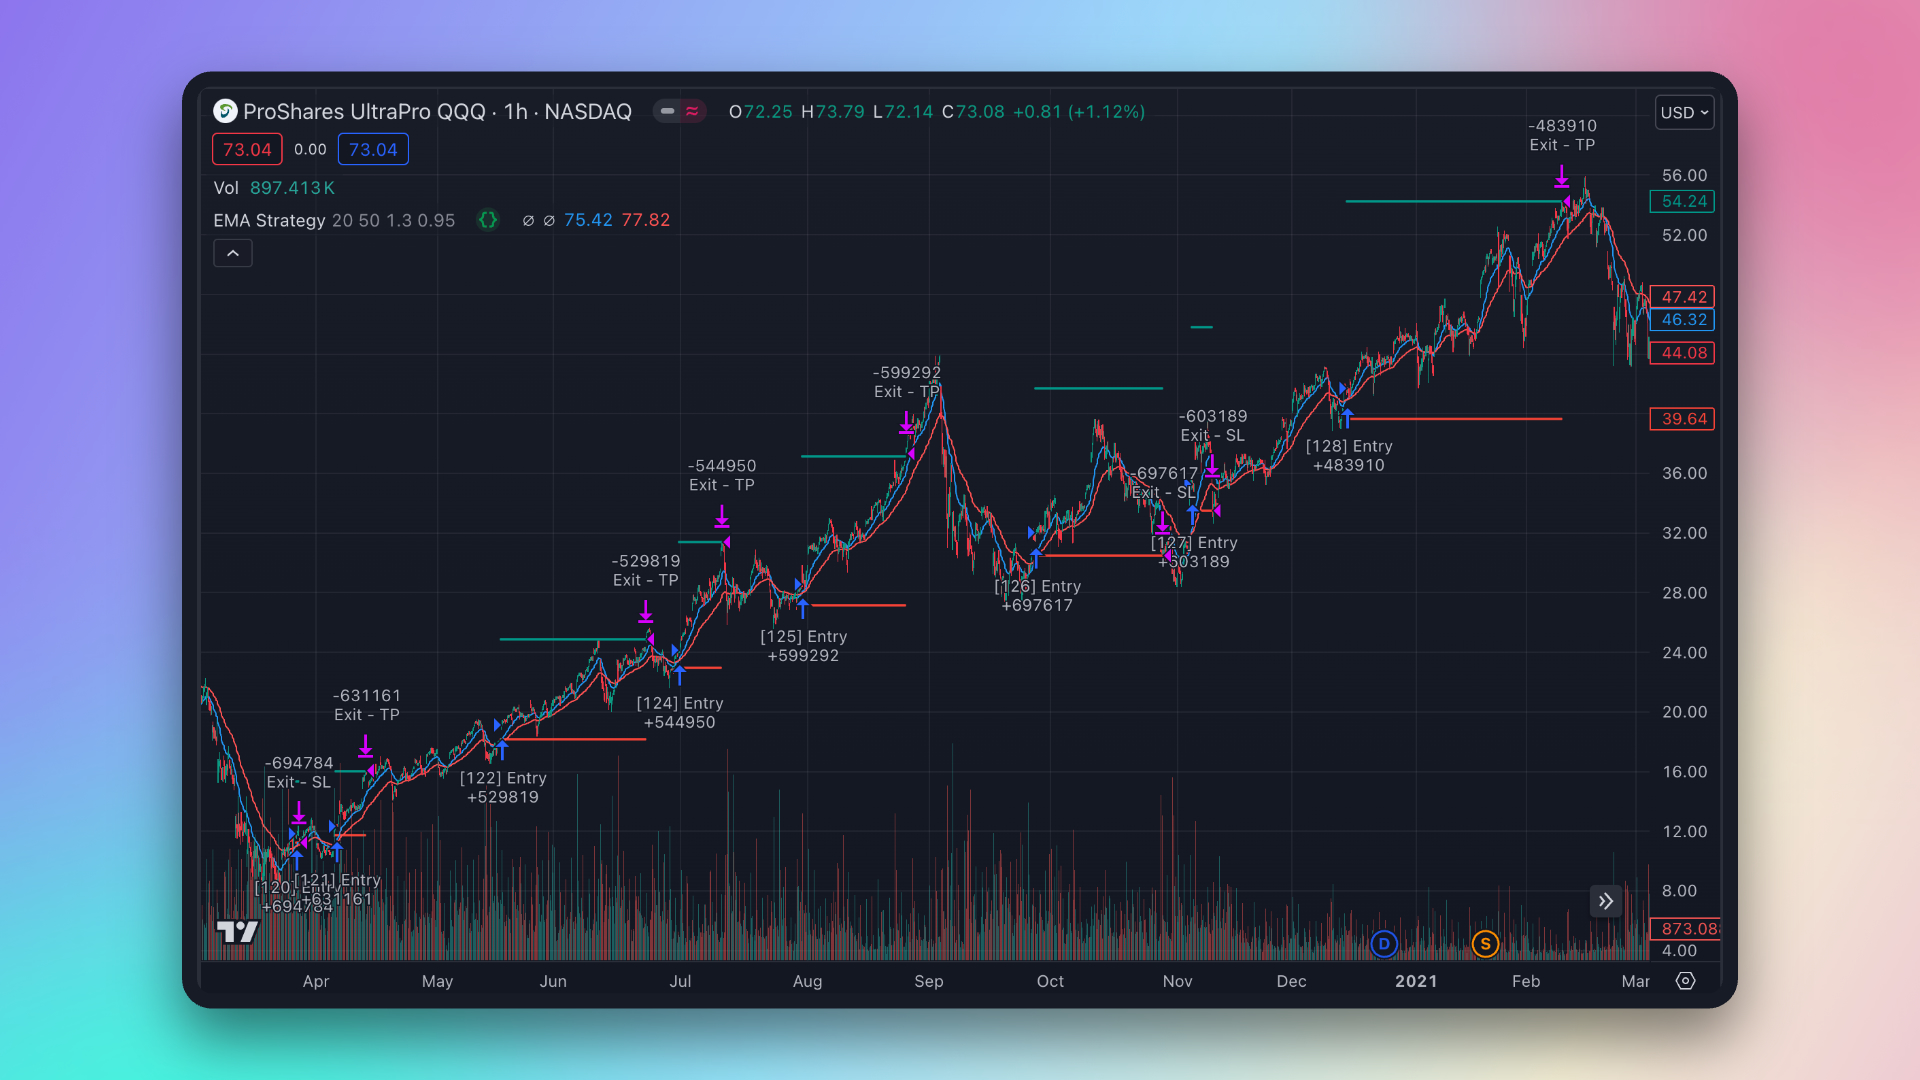
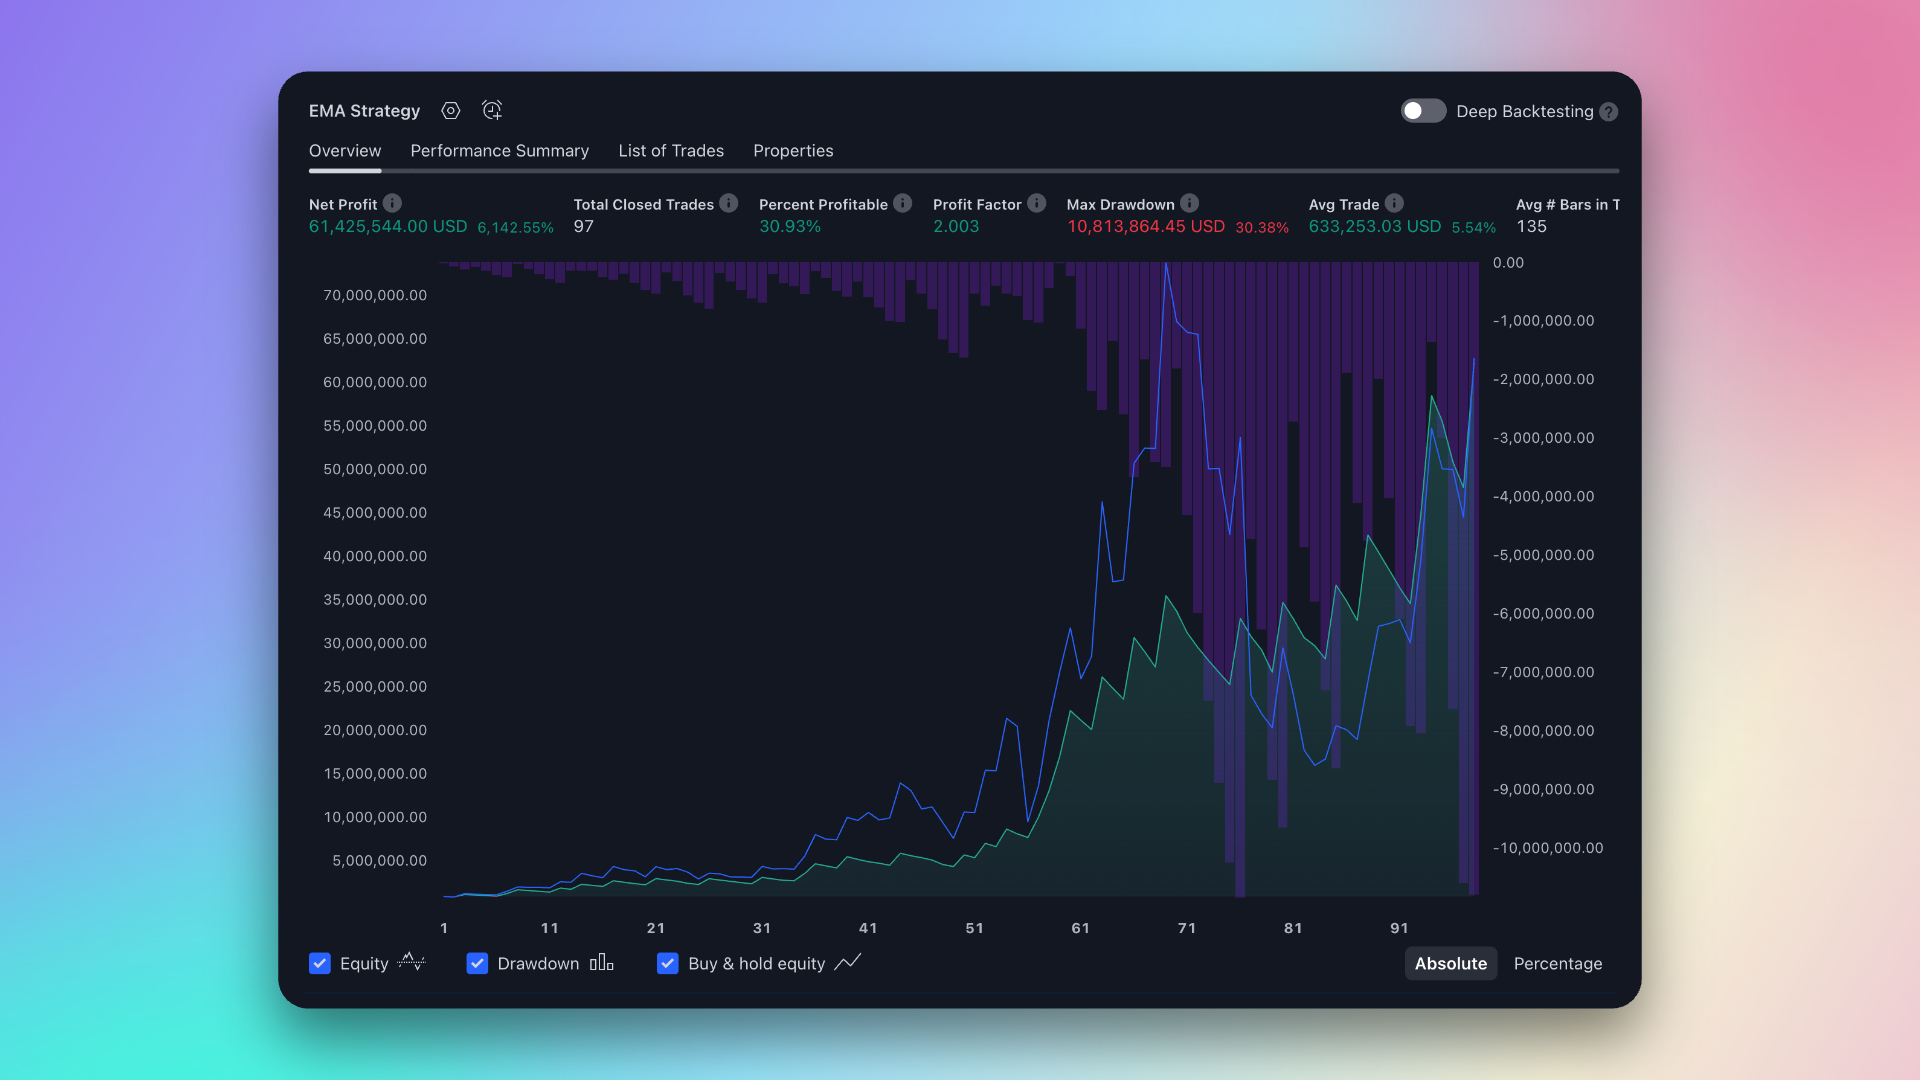
At this time, you can see the strategy and the backtest results on the chart.
Through Pineify, you can build any strategy you want using the builder. Start trying it out now~